Tuesday, August 5, 2008

Death of a Jester

Death of a Jester was made using 30 grams of 650 lowfire/slowdry metal clay. I pressed it into a matrix board that was used to create rubber stamps by "Stamp Of Excellence" Purple and White cz's were set into the clay for embellishments. After obtaining a mirror finish I dipped the piece into liver of sulfur and Mr. Clean Blue.
Judi, from "Stamp Of Excellence" is working with me as I design rubber stamps that can be used in scrapbooking and metal clay. I find by using her moulds that she makes for the stamps it is easier to cut around the shapes without distorting the edges. This particular design is one that Judi designed for me to try.

Monday, June 30, 2008

New Leaves

Today is a beautiful day in the mountains so while I've been working in the yard I've been picking small leaves. I waited through the long winter with so many ideas but no leaves so this year I've decided to pick leaves as I find them and give them 2-3 coats of silver paste. I can set them aside in a safe place to finish this winter as I work on new designs. I am also experimenting draping the leaves as they dry with various size objects. When I fire them I will support the areas as needed with bits of fiber blanket. Another reason to expand my flower beds.

Sunday, June 29, 2008

Colorado Chapter of Art Clay World Society

What a great day I had yesterday with everyone here from the Colorado Chapter of Art Clay Society. I met such great new people and visited with old friends. Thank you each for coming and sharing your artwork with us.
Jen Lowe gave a great presentation on blogging and a short demonstration on quilling with silver paper.
Congradulations Sherry on completing your senior certification. Your class pieces are awesome. I am so happy for you and the opening of your new studio and classroom, "PaperSilverStone" and "Peacock Gallery" in Canon City, CO. I will be there as often as I can.
What a inspiration each of you are, and now, I really don't have anymore excuses to put off starting new designs.
To all my new friends from Grand Junction, CO. I am all for starting a day we can all get together once a month or as often as possible. Email or call anytime.

Sunday, June 15, 2008

Spring

Just to touch base. I wanted to thank Feedjit for adding Israel's flag to their world map. It is great to see it included with all the other national flags. It is spring and yardwork has taken over my life for the moment. I have planted lots of flowers and a few vegetables. It has been right at freezing everynight so I have been covering the plants trying to keep them alive. We are also in the process of painting the exterior of the house as well as rockwork and finishing the deck we started last year.
I am working "slowly" on a new necklace and have several new sketches for designs. Some of these designs will be shown as patterns later.
The 28th of June we are having the Colorado Chapter meeting for Art Clay World at my home and I'm looking forward to meeting new members and visting with everyone.

Thursday, May 8, 2008

Star of David eyeglass pen


This star of David eyeglass pen was made by rolling out 20 grams of clay and cutting it into a rectangle shape. Next I rolled out an additional 5 grams of clay and cut a second piece to lay over the top Attach it by brushing on a layer of silver paste. Fill the edges with paste or by using the syringe. Cut out a small opening for the glass frame to slide through. Attach a brooch finding to the back.
I sand my pieces in the greenware stage using all grits of sandpaper before attaching any embellishments. Embellishments can be made at any time with left over clay and stored for later use. I've been saving the clay star for some time and when I was invited to a Brit Milah cermoney, it was fast and easy to make something special.

Friday, March 21, 2008

Leaf Ear Rings

There are a variey of ways to use leftover beads and clay from previous projects. These simple ear rings were made by pressing left over clay into a leaf mold. Eye screws were attached to the back of the leaves. Once dry, sand and fill any areas needed and fire. Swarovski beads were used for sparkle with sterling silver ear wires.

Thursday, March 20, 2008

Quilled Ear Rings

This is a nice way to use leftover quilled pieces that are made from silver paper. I rolled out a small piece of metal clay and set the quilled pieces on that attaching them with paste and then cut around the shape. I inserted pure silver findings from Art Clay World between the roses and leaves. After firing I used a soft brass brush to burnish the pieces leaving the very centers with a little of the white firescale for contrast.You can also set fired pieces of quilling on sheet silver and attach them with oil paste.

Tuesday, March 18, 2008

Krafty Lady molds

Krafty Lady of Australia is making a mold for me of the mask you see here on my blog, "Masquerade". Once it is ready to market I will be selling the molds here and will include instructions on how to use the them. Using molds allow the beginner to make detailed pieces without the worry of design. If you find a mold that you like and then make and add emblishments you can create a variety of different pieces for special occasions.

I will keep you informed as to when the mold will be ready for sale.
Meanwhile, our new puppy has kept me busy potty training her and trying to teach her not to chew. Her jaw reminds me of the venus fly trap. Everything that moves is up for grabs. Otherwise she is a doll. She is 7-1/2 weeks of flapping ears, sad eyes, elephant feet and an expression to melt your heart. "Sophie" is our new boxer puppy.

Monday, March 10, 2008

Ocean Enchantress

Ocean Enchantress was originally made with FIMO clay. Once a model was made I used Art Clay World’s 2 part silicone mold mix to make a mold of the mermaid. Then clay was pressed into the mold to get the shape in metal clay. Once the metal clay piece was dry I sanded each area filling with paste a needed to get a smooth piece. I then rolled out metal clay and set the mermaid on it next to a bezel that was fitted to a pre-selected stone. I cut out around the mermaid and bezel and filled the areas as needed. On the back of the piece I added a bail back and fired the piece in the kiln. When the fired piece was cool I sanded it with all grits of sandpaper and polishing cloth to obtain the mirror finish.


Working with polymer clay to get details in a shape is faster and easier than shaping and carving a piece to get this much detail.

Saturday, March 8, 2008

Diachroic Blue

This is another example of diachroic glass that I cut into a diamond shape. Using the same method as in "Teardrops" I build the metal clay up around the glass to the desired thickness. To come up with ideas I place the glass pieces on white paper and sketch around the stone. After you have the size and shape of the stone on paper start sketching until you come up with a design that you like. I always make a copy of the sketch before starting my silver piece and file it away. These simple sketches make great patterns for classes.

Monday, March 3, 2008

The Piano

This beautiful song has so much meaning that I had to share it with you. Listen to the music as you scroll through the site. May you enjoy it as much as I do.
The Paino by Aidan Gibbons


Sunday, March 2, 2008

Teardrops

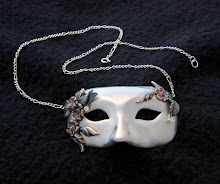
"Teardrops" is part of the Anna's Broken-Heart series. "Teardrops" represents the tears of all children who cry in pain and the parents who suffer with them. It represents Suvivors of the Holocaust, the loss of lives, the children who were sacrificed and the soldiers that died in vain. It represents the tears of people alone, hiding their pain and sorrow. 100% of the proceeds from this series goes to the Lucille Packard Children Hopsital and to another in Israel. See http://www.silverartstudio.com/ and http://twins.lpch.org/help.html for more information and donations. Just mention "Anna's Broken-Heart.

To make this piece teardrop shapes were cut from diachroic glass then ground. When cutting and grinding glass the edges have a matt finish. Often when firing the pieces come out with a haze. I found it helps to sand the ground edges using sanding disc from Rio Grande Jewelry , part # 337259 https://www.riogrande.com/home/MemberArea/NewSearchResult.aspx after grinding the edges. Wash and dry the glass piece to make sure it is clean. Then fire polish the piece in the kiln using the appropriate temperature settings for your kiln.

When making the piece I used low fire/slow dry clay and built the clay up around the stone. I have put a slide show here of a few of the pieces that I made. You can see on some the clay comes up higher around the stone than others. Remember that glass expands and metal clay shrinks so when you fire the pieces, ramp the kiln slowly. I fired these pieces to 1200 degrees for 30 mintues and then let the kiln cool to room temperature without opening the door. Waiting to see if the pieces turn out is the hard part. Tip: If the clay is too thin in any area around the teardrop, the clay will form hairline cracks. It takes practice to fine the right combination.


In His Hands

In His Hands

A cry is heard in a far away land
As a mother sobs, nearby the father stands

Hearts are breaking for the one just born
A tiny life that seems so forlorn

There are no answers, no reasons why
A child is born with such pain in it’s life

I felt their pain as I looked at her face
A life so small, a speck in space

Look at her eyes as she gazes at him
In the hands that hold her safe within

If Jehovah can hold the whole world in his hands
Then what is one life when it comes to Him?
© Colleen Lee 2008


Thursday, February 28, 2008

Quilling with Silver Paper

Quilling with Silver Paper is another way to add embellishments to any piece. To make leaves cut strips 1/16” wide the length of the silver paper. Place the tip of a round toothpick on one end of the paper. Roll the paper around the toothpick. Gently slide the toothpick out of the rolled paper. If you want a looser effect or larger look loosen your grip on the roll and let it spring outward a little. With the toothpick, add a drop of silver paste to the open end and press it closed. To get a teardrop shape, press the rolled paper more on one side. Put the quilled piece on a firebrick and do not touch again. Remember: Too much moisture will cause the paper to disintegrate and moving the pieces once you have added the paste will cause minute fractures in the paste breaking the bond


To make roses, cut a ½” square and round the corners. Cut a spiral into the center of the square as shown. Then, using the toothpick, begin at the center and roll toward the outside edge. Once again, pull the toothpick out and apply a drop of paste to glue the open end shut. Set this on the fire brick to dry.

I have found that if I let this dry 30 minutes and then torch fire my pieces for 1 minute, I can then attach these pieces with oil paste to a fired product.
When torch firing the quilled pieces, hold the torch back from the pieces lowering it as it heats. Heating the pieces too fast cause them to spring open.

Quilled roses have a cone shaped base so I set the leaves first leaving a small area to set the cone of the rose. This gives support to the roses and will also hide any imperfections or additional paste if it is needed to attach the rose.

Sunday, February 24, 2008

Colorado Art Clay Society Chapter

Today was our first meeting for the Colorado Chapter of Art Clay. It was held in Lafayette, CO. Discussions on setting up the chapter, meetings, fees, and adgenda were gone over and future meeting and locations decided. What a really fun group was there today. Each person there was dedicated to learning about metal clay, sharing and giving what they could to each other.
Sitting on the side watching I couldn't help but think how lucky I was to be a part of this group of women so excited about our new adventure and all the possibilites it has. For those of you who missed out today, Jen has an amazing amount of talent and information she brings to all the meetings so make sure you have the meeting written down on your calendar when it comes out. That will be posted here and on Jen's blogspot also.

Saturday, February 23, 2008

URL address and feed change

Today I'm in the process of moving my blog to it's correct URL address. Please bookmark this site or change your feed email. Thanks for your patience. Colleen Lee

http://wwwsilverartstudiocom.blogspot.com/

Friday, February 22, 2008

There are no "Square Pegs"

I met a really nice woman yesterday who had contacted me to see if I gave oil painting classes. It has been a good 15 plus years since I've attempted painting with oils. I told her that I would love to have her come by and we would learn together, just a fun day of trial and error, encouraging each other. And it was. We both got out our old tubes of paints, took an inventory of what brushes and supplies we had and agreeded we were going to start something small and simple. By the end of 3 hours I had shades of green smeared all over a small canvas and a new friend. What a great way to meet people and have fun. A few years ago I spent 5 weeks visiting my sister in Phoenix. She was working for a company there and ask me to come visit and do some drawings. I had not done much with my art through the previous years and being in Phoenix, around artist and crafter was so interesting. At the end of the 5 weeks the company took us to CHA in Las Vegas. We each had name plates with our names and a nickname under it. I ask to be the "Square Peg That Didn't Fit In" as I was with a group of scrapbookers and I didn't know how to do anything that they were doing. BUT, I started drawing again and experimenting with various crafts, and the creative juices started flowing. I have been tossing the idea around of having women come a couple times a month, bring their craft of choice and just have fun working and visiting with others who have similar interest. having a blast while being creative. I wanted to find a way to help people who were new to an area, people who might be lonely and wanted a way to meet others in a fun environment. A place where there were no square pegs because the circle of friends they made just became larger and larger allowing every square peg to fit into an ever increasing circle of friends. So, yesterday became the first of "hopefully" many more, "Square Peg" creative play days. Just remember there really are no "Square Pegs".

Sunday, February 17, 2008

Obtaining a Great Mirror Finish

I have often heard metal clay artist say that getting a mirror finish is almost impossible. This can be challenging at times. I have found that by sanding each piece before attaching them eliminates a lot of this. I hand sand every piece beginning with 600 through 2000 grit sandpaper before attaching the pieces to each other. Once I fire a piece I repeat the process. Then I use all grits of polishing papers, using as much pressure as I can with each. I only use a dremel tool to polish tiny areas on the inside of circles or in deep crevice areas that I cannot get sandpaper into. I find it similar to working with wood. Each sucessive grit of sandpaper seals and closes the grains of wood. In metal clay, each successive grit of sandpaper fills and closes the pores in clay. I recommend using a dust mask and sanding with the help of a magnifying lamp which allows you to see tiny scratches and imprefections as you move through each level. I wash my hands at least twice when using polishing clothes because silver dust and particles get imbedded in your skin if it is callused. This can cause minute scratches on a high shine. I cannot emphasis enough the importance of sanding before and after firing if you want a flawless mirror finish. With practice you will pick up tips that work best for the piece that you are working on.

Friday, February 15, 2008

Totzeret Bait


This piece was made for Ran Damari, the composer of the band Totzeret Bait in Israel. Ran wrote and played the song you hear on my website http://www.silverartstudio.com/. It is a picture of his sister who has been a continuous inspiration to him. I sent a drawing to Stamp of Excellence asking them to make a stamp for me that could be used in metal clay. Patina was applied after firing to bring out the details. The ability to incorporate personal photos into your artwork makes each piece of jewelry you create more personal and lasting.

Bleeding Hearts


"Bleeding Hearts"
Bleeding hearts are delicate
As they hang on the vine.
Tiny hearts, just so fragile
Each and every kind.
Little baby hearts are
Similar in many ways
But when there’s one that’s damaged
It will bleed and hurt all day.
Every little broken heart
Has a message and a song
Bless the baby’s broken-heart
Trying to be strong.

© by Colleen Lee and Jen Lowe

Thursday, February 14, 2008

I Am My Beloved and My Beloved Is Mine


Can you imagine any gift that would be more meaningful than a piece of pure silver jewelry with an inspription that you designed? To make this simple yet meaningful wedding ring, I went to my favorite stamp store http://www.stampofexcellence.com/ and ask my friends if they would make a stamp with the Hebrew inscription "I Am My Beloved And My Beloved Is Mine" I wanted a ring that would be as meaning to someone else as would be to me. I was amazed at how simple this project is. Simply roll out the clay, stamp it with the stamp of your choice and cut it to size and paste the ends. Once I had my piece dry I sanded it using all grits of sandpaper. This particular piece was fired with the torch. After firing I used all grits of sandpaper again and then polishing papers to obtain the mirror finish. Can you think of anything more special to give your fiance' as a wedding gift than to make your own wedding bands. Something to be cherished forever.

Thursday, February 7, 2008

Peacock's Pride


Peacock's Pride is another example off quilling with silver paper. 29 strips of silver paper were quilled and shaped as teardrops with blue gemstones set in the center of each. The peacock's body was shaped from a piece of silver clay with 2 white gemstones set for eyes. All pieces were then attached to .999% pure sheet silver. With just a little imagination I believe the possibilites are unlimited with what you can do.

Tuesday, February 5, 2008

Cameo


Working with silver paper can be great fun. This cameo was my first experience using silver paper. By cutting strips or squares you can achieve effects similar to those found in paper quilling. Tips: Since silver paper disintegrates with moisture you want to use the smallest amount of paste needed to attach the open ends. Once you have applied paste to silver paper, set it onto the firebrick to dry and do not handle it again. I found that if I fire my my quilled pieces seperately from the piece that I'm attaching it to I have better luck. I torch fire the quilled pieces on fire brick. Hold the torch back as you begin heating your pieces and slowly lower it closer to the pieces as they heat. Too much heat too fast causes the quilled pieces to spring open. I then attach the quilled pieces with oil paste and refire the entire piece when everything is in place. This also allows you to get a better finish on the background piece than you would if you attached the quilled pieces before firing.

Sunday, February 3, 2008

What is Art Clay Silver

Art Clay Silver is made of tiny micron sized silver particles mixed with an organic binder and water. When fired the organic binder dissipates leaving .999% pure silver. This pliable clay can be rolled, pressed into molds and shaped. Rubber stamps and natural objects such as leaves can be used to add texture when the clay is moist. When metal clay is in its dry stage, it can be carved and sanded to add detail or to obtain a smooth surface. When fired, metal clay can then be hand polished to obtain a mirror finish, polished with a burnisher or in a tumbler. Color can be added to the finished piece by enameling or by using liver of sulfur to obtain subtle shades of color. The wonderful thing about metal clay is that you have the ability to design and make a piece of jewelry in one day and wear it the same evening. What a great and exciting way to express yourself while at the same time displaying a unique piece of art and creating an heirloom

Thursday, January 24, 2008

I'll Remember


I’ll remember

I remember the day when they said that they knew,
That you would be born with something askew.
Your heart was not right and everyone knew
Any days we had would be precious and few.
I cried for awhile and then wiped my eyes
With great grandmas hanky I was saving with pride.
A miracle happened when you suddenly arrived
Beating all odds, you fought to survive.
Your cheeks are so rosy that no one would know
How sick you still are as you run and grow
Every day that you’re with us is wonderful indeed
As you surpass all odds and grow like a weed.
My love grows stronger and my faith remains true
How much time is left we wish we knew.
As each year passes, know in your heart
I’ll remember you as I design each and every “broken-heart”

© by Colleen Lee 2007

Tuesday, January 22, 2008

What a Wonderful Feeling

What a wonderful feeling to realize that no matter what your age, you are never too old to do all those things that you always wanted to do and never had the time to do or never allowed yourself the time to do them. I have always loved art and tried painting, drawing and various crafts off and on through the years. I never thought that I was actually good enough to do anything with my art because at the age of 21, someone told me that I would never be an artist because I didn’t have a college degree. And I believed them! For the most part I set everything aside to raise a family and work in my husband’s construction business. I took it for granted that I would always have time to be creative later. But as you know, months turned to years. Two years ago I was browsing in a bookstore and found a bookmark that said “You are never too old to be what you might have been”. Something clicked! I got it! I am NOT too old to be what I might have been. I realized that God gave me a wonderful gift, a talent. It has become my goal to use this gift and give part of it back to God to help others. Three years ago our granddaughter, Annastesia Hope, was born with heart defects. I decided to design a line of jewelry called “Anna’s Broken-Heart” Each year I will make a piece of jewelry to honor Anna's struggle and the struggle of all children born with "broken-hearts". 100% of the proceeds from this line of jewelry will go to the Lucille Packard Children’s Hospital in California and one in Israel. With each piece I will inclued a poem along with a description of the piece.