http://www.lindapetersondesigns.blogspot.com
Monday, December 13, 2010
Watercolor cards
http://www.lindapetersondesigns.blogspot.com
Friday, December 10, 2010
Another "Teardrop for Anna"

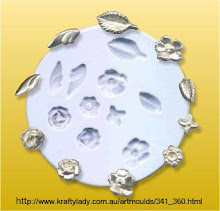
As another year draws to a close I am trying to get back into my studio. Another" Teardrop for Anna" is part of my collection for children born with heart defects. This piece was made by rolling a coil of clay and draping it around a piece of diachroic glass and looped from front to back to form the bail. The leaves were made from leftover clay in one of "Krafty Lady's" molds and attached with silver paste. The design idea was my sister-in-laws. Thank you Mary.
If any of you would like to make a piece like this I do have diachroic teardrops in various colors and sizes. Email me for more information.
Monday, November 29, 2010
Simple and Elegant "Class" project

How easy it is to make beautiful bracelets using metal clay. For this piece I used 35 grams of low fire/slow dry Art Clay and rolled it out 2 mm thick. I added the extra thickness for strength. Then I used one of Stamp of Excellence's stamps and pressed it into the clay for this design. I free formed this piece and let it dry then sanded and finished the piece as usual using Rio Grande's Black Max to patina. Now I have this simple yet elegant bracelet that I can wear to any outing, causal or formal. Judy, at Stamp of Excellance, has several great stamps that can be used for bracelets such as this. http://stampofexcellence.com/
Friday, April 3, 2009
Polymer Clay Turqoise Stone
For those of you that don't want to spend the extra money to purchase turquoise stones, you can always make them from polymer clay. This look alike stone was easy and fun to make with 2 colors of polymer clay and black acrylic paint. To make this piece roll out your clay and cut it into a square. Roll out a strip for the bail and stamp it with a design. The stamp I used here was from "Stamp of Excellence". Cut around the shape. Fold the bail over a small straw and attach it to the square with silver paste. Fit a silver bezel around the polymer clay shape and press the bezel gently into the piece. Around the bezel I applied drops of silver with a syring. Fire the piece. When cool sand and finish it. Place the polymer clay stone into the piece and press the bezel edges to it. Great for beginner classes. By showing someone how to make a polymer clay look alike along with a metal clay piece you are promoting 2 products with a low cost.
Tuesday, March 31, 2009
Mask of Leaves
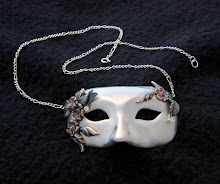
This is another sample of what you can do with the mask mold. I found some leaves on a bush and applied silver paste to them. After firing the leaves and polishing them I attached them together with oil paste and fired them in a kiln.
To make the mask I rolled out the clay and pressed it into the mold, cut around the edges and cut out the eyes then removed the piece from the mold. I attached bail backs with silver paste on the outside edges on the back. After sanding the ma
sk and firing it I attached the leaves with oil paste.
When the piece was cool I sanded and polished the piece. To achieve colored leave use Mr. Clean yellow, blue or both with liver of sulfur. I apply it with a small paint brush to avoid as much repolishing as possible. The first photo is before applying liver of sulfur and the second after. You choose which method you like the most. Remember you can always sand the color off the leaves or refire it to remove the color.
sk and firing it I attached the leaves with oil paste.
When the piece was cool I sanded and polished the piece. To achieve colored leave use Mr. Clean yellow, blue or both with liver of sulfur. I apply it with a small paint brush to avoid as much repolishing as possible. The first photo is before applying liver of sulfur and the second after. You choose which method you like the most. Remember you can always sand the color off the leaves or refire it to remove the color. Sunday, March 29, 2009
"Happy" the dog, eyeglass pin

I love what you can do with Stamp of Excellence Stamps . To make this eyeglass pin, I rolled out 2 ovals shapes. On one use any stamp you think would be appropriate, stamp into the clay and cut the shape out. Roll out the second oval shape and lay your shape onto it. Attach it with silver paste. Then cut out an area to slip your glass frames through. Attach a brooch finding on the back, sand and fire. I used Max Black to outline the shape with a fine tip brush for more control instead of liver of sulfur. There are so many fun and quick pieces you can use to make intro and beginning classes fun.
Tuesday, February 17, 2009
Home for sale in Eagle CO
Time has flown by with very little time to be creative, something I really miss. We have taken this past year to start a business and remodel our house so that we could put it on the market. Since my husband is a custom builder we decided to make all the trim for our home. Every board is cut to length and width, planed, and sanded. Then filled and painted after installation. We put in new floors, granite counter tops and added a plate rack in the kitchen, which doesn't show on the video. The master bath was totally remodeled with new floors, tub and countertop as well as the utility, powder room and foyer. There are all new doors downstairs with refinished doors upstairs.
We spent last summer painting the outside of the house adding boulders throughout the yard.We put in a flagstone walk while terracing the back yard with rock walls creating multiple flower gardens. It has been a huge project but we love the results. We are completing the wood trim throughout the upstairs and are hoping to have the final touches within a couple weeks. After that............ I will be able to start creating and playing again! I've several new pieces that I made on a 3 week summer trip to San Diego while my sister, Jen Lowe, taught classes. As soon as we have the last of the remodeling done I will give these pieces their last touches and have them on my blog, unless of course the house sells. Our realtor had a video of our home made to use on his website and MLS listings. I have it here on my website. Please feel free to send the video to any friends that might have any interest in moving to the mountains. I have the best neighbors possible and views of the mountains have really been an inspiration while working in my studio.
Subscribe to:
Posts (Atom)